10 Easy Doodle Patterns for Beginners
Ten repeatable patterns you can build from a few familiar marks, with practical ways to vary spacing and shape.
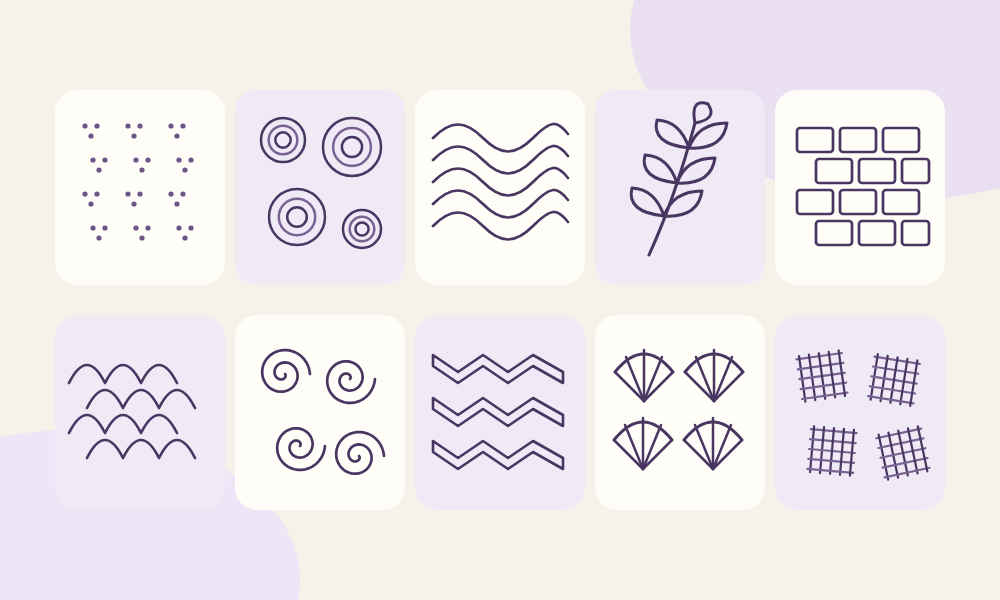
Small marks, useful practice
You do not need a subject or a finished picture to begin doodling. A pattern gives your hand a small sequence to repeat. These ten exercises use dots, curves and straight lines; uneven marks are welcome. Try two or three patterns before choosing one to develop.
Set up a small practice page
Use a pen and paper or a drawing canvas. Divide the page into ten loose spaces, or work in one small corner. Keep the same tool for the first pass. Make five repetitions of each pattern before changing its size or adding color.
1. Dot clusters
Place three dots close together like a tiny triangle. Leave a dot-width gap and repeat the cluster. Stagger the next row so clusters sit between those above. Vary the distance between groups while keeping the three-dot unit recognizable.
2. Nested circles
Draw a small circle and add two larger circles around it. Start another group beside it, leaving a little space. The rings need not share a perfect center. Alternate small and large groups for a pebble-like arrangement.
3. Gentle waves
Draw a line that rises and falls in broad curves. Below it, draw a second line following the same bends. Add three more rows. Keep a small gap between lines; if they touch, continue instead of erasing.
4. Leaf pairs
Draw a short curved stem. Add an oval that tapers to a point on each side, with both leaves meeting the stem. Repeat farther along the curve. Finish with a single leaf at the tip to make a sprig.
5. Brick rows
Draw a row of short rectangles. In the next row, place each rectangle under the join between two above. Continue for three rows. You can draw a few gaps or rounded corners to keep the wall from looking rigid.
6. Scalloped scales
Draw connected upside-down U shapes across a row. Begin the next row halfway along the first arch, so each new arch overlaps two above. Repeat downward. Make the curves wide enough that you can see the overlapping rhythm.
7. Open spirals
Start with a small curl and circle outward twice, leaving space between turns. Stop before the spiral touches its neighbor. Repeat with some turning clockwise and others counterclockwise. Start farther from the center if tight curls feel awkward.
8. Zigzag ribbons
Draw a shallow zigzag across the page. Add a second zigzag just below it, following the same turns. Join the two ends to make a narrow ribbon. Repeat with a wider gap or flatter peaks for a different result.
9. Tiny fans
Mark a small dot. Draw five short rays spreading upward from it, then connect their tips with a curved edge. Repeat the fan beside the first. Turn every other fan sideways to create a loose, alternating pattern.
10. Crosshatch patches
Draw five short parallel strokes in a small square-shaped patch. Add five strokes across them at an angle. Leave a gap before making another patch. Rotate the next patch slightly; overlapping lines can stay light rather than becoming a solid block.
When the pattern gets crowded
Enlarge the repeating unit or leave an empty row. If you lose the sequence, identify just the next mark rather than rebuilding the whole pattern. Choose one variation per patch so you can see what changed.
Common questions
Do I need a ruler? No. A ruler can make the brick exercise precise, but freehand spacing is enough for every pattern here.
Should I fill all ten spaces? No. Stop after one sample, or return later. Keep a pattern you enjoyed and use it as a border around a note or a small color patch.
Make room for a little drawing
Try an open canvas or a coloring template in MoodMirror, and add a mood journal entry if you feel like reflecting.
Try MoodMirror